Sunday, December 20, 2009

Midwinter Series 2


This is the second of my barn images for my Christmas cards this year. This scene doesn't feel as cohesive for me as the first one, but I tell myself they are just little cards...it's hard to get details and the like set up correctly on this scale, or at least it's difficult for me.

I wonder how miniature painters do it....particularly those who work with watercolor.

Both scenes are on 140# Arches cold press.

Merry Christmas to everyone!

Sunday, December 13, 2009

Midwinter Series


I did a series of cards several years ago that I first called the "Snowy Barns," and then, when I had them professionally printed, they turned into the "Midwinter Series." That first set of four images perfectly fit selected lines from Christina Rossetti's "In the Bleak Midwinter."

By now, the Snowy Barns (can't help but still call them that) have become my annual Christmas card subjects. I really procrastinated on setting up this year's cards, and finally had to resort to taking them to work to get them finished (I have a small dead period at the end of the night, and that half hour for a couple of nights did the trick).

So, here is the first of the barns for this year. This is my favorite of the two. My husband prefers the second, which I'll post soon.

Monday, October 19, 2009

Iris mini in progress


Another of the iris miniatures. This is the one that I mentioned in an earlier post . . . I have not made any further progress on it.

This mini is on 300# Arches cold press. I don't have a lot of experience with 300# paper; it absorbs water and pigment in a much different way than 140#, so it's been interesting to apply wet-into-wet techniques -- but it also takes a very long time to dry.

An advantage to the heavy-weight paper is that I don't have to tape the paper down, plus I have torn the edges to create a natural effect, with paint going out to the edges. It has bowed slightly as I have worked on it, but once I'm done, I can flatten it by wetting the back and placing it between some heavy weights.

Friday, October 9, 2009

Watercolor class recap


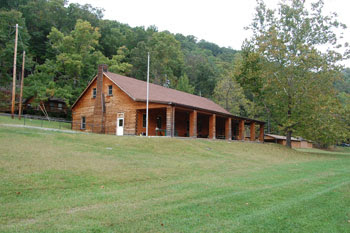
The class for the women's retreat was held in Dodd Hall at Hardy County's Camp Pinnacle. The building serves many purposes for the camp, including dining hall, assembly hall, and casual hang-out. The camp itself is in a secluded space between a mountain ridge (topped by the rock formation known as Pinnacle) and the overflow channel of Lost River/Cacapon River.

Lost River, one of West Virginia's natural wonders, goes underground near the camp, and when the river rises again on the other side of Sandy Ridge, it is known as the Cacapon. But not all the water can fit within the underground cavern that carries the river's flow. In rainy seasons and during floods, a rocky channel around Sandy Ridge carries the excess water to the head of the Cacapon.


The first night of the session was devoted to a discussion of watercolor materials and methods, including exercises where I had the ladies practicing flat washes, graded washes, glazing washes, and experimenting with wet-into-wet washes. We also worked through creating different brush strokes by varying the angle of the brush and the pressure used during the stroke, as well as having fun with watercolor resists: crayon and masking fluid. The ladies also loved splatter techniques, backruns, and salt for mottled effects.

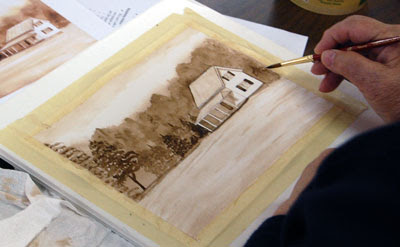
These exercises, using single pigment color (VanDyke Brown in the Cotman line), were then used the next morning to complete a landscape. In the photo above, Kathy has nearly finished her painting, and is adding one more tree shape to balance her composition.


After completing the one-color landscape, we moved into a discussion of mixing colors. Mostly I wanted to stress that, in watercolor, there are different ways to mix colors, whether by mixing on a palette, mixing wet-into-wet on paper, on glazing one color over another already dried on paper. So we completed some experiments of mixing an orange from Alizarin Crimson Hue and Cad Yellow (all Cotman) in the three ways, and compared and contrasted the results from each.

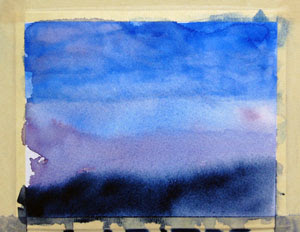
This led into a more abstract landscape where we created a mountain scene under the multi-colored sky of a sunset.

We completed one set with sky colors ranging from Indigo, to Thalo Blue, Alizarin Crimson Hue, and Cad Yellow, all added in a wet-into-wet style so they would blend. When this dried, we added the mountain range shape in Indigo, and then spiked the base of that shape with some VanDyke Brown to add the suggestion of foreground ridges.

After completing that project, I gave the ladies new sheets of paper and had them try their own versions of a misty mountain landscape. Above is Judy working on her project, as well as a closeup of what she was working on. She wanted to add the purple areas to suggest even more distant mountain ranges and, she admitted, because purple is her favorite color.

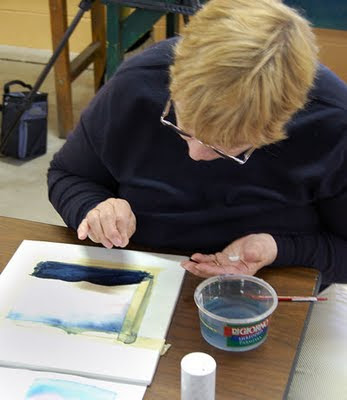
Here, Kathy is applying some salt to her second mountain landscape. Several of the ladies tried this technique, some with good results. The trick is to add the salt at just the right moment. If the paint is too wet, it creates large blotches, too dry and the salt doesn't work at all. I told them I rarely use the technique myself because I have difficulty gauging the timing.


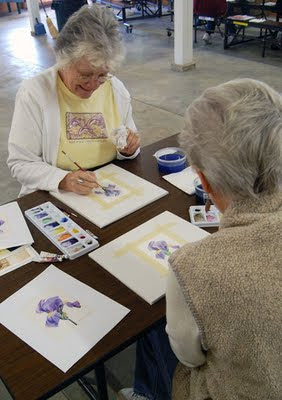
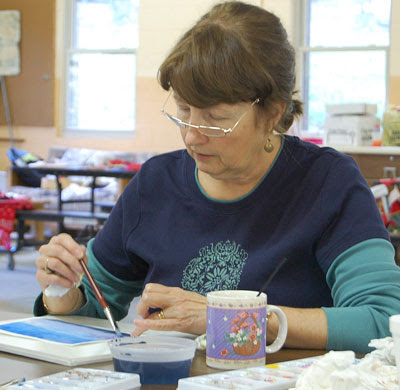
On the last day of the class, we tackled a floral. Using a color copy of one of my iris studies as a reference, the ladies began placing light washes of a mixed purple onto the paper to define the basic petal shapes. We had mixed the purple from Alizarin Crimson Hue and Thalo Blue, and had created two versions: One with more red for a warmer look, and one with more blue in the mix for a cooler version. Alternating these different purples around the petals adds more interest and depth into the shapes. Here, Lois and Fern work on their irises using the two colors.


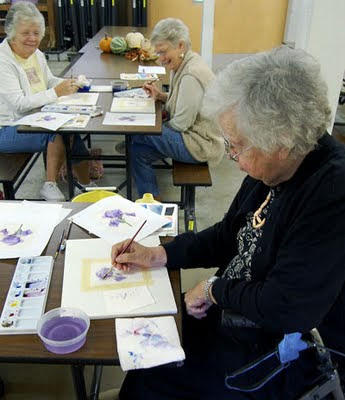
Here, Mary concentrates on darkening shadowed areas of her iris petals. The ladies had to add color glazes in light layers on each petal, and carefully manage the edges of their glazed washes to create smooth transitions between light and dark areas.


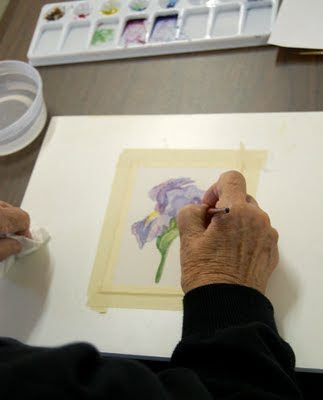
A closer view of Mary's iris shows a different stroke technique. Mary admitted to being a "dabber," feeling more comfortable with short strokes. In the case of the iris, that method created a unique textural effect that made her blossom look more like one of the heavily ruffled varieties of bearded iris.


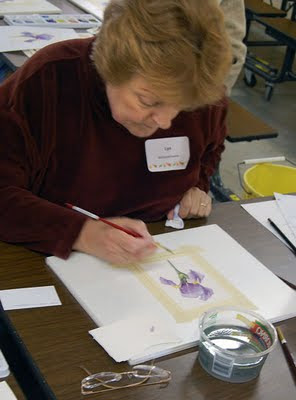
As the class draws to a close, Lyn finishes with some details in preparation for applying light veins over the petals, the final step in making the bloom appear realistic.

It was a busy three-day session, marred by my clumsiness (I twisted my ankle, and had to teach a good portion of the class while sitting down), but I think that the final results for everyone were encouraging.

Again, I want to thank my pupils for their patience and enthusiasm for the projects. I also want to thank the retreat organizers, particularly Miriam, Susan, and Helen, for a great time!

Thursday, October 8, 2009

Class was a success!


I couldn't stand back far enough to get everyone into this frame (my sixth student, Kathy, would be at the far left), but I want to thank Judy (from left), Lyn, Lois, Fern, and Mary for a great weekend at Camp Pinnacle.

These six marvelous ladies completed a series of preliminary exercises that complemented several painting projects: two landscapes and a floral.

I have several photos of the class to post, and I will do that very soon. I believe that the class accomplished my primary goals: To encourage the participants to continue painting with watercolor, and to provide them with basic knowledge and tools on which to build skills.

Wednesday, September 23, 2009

Class is filled!

Got word from one of the Hardy County Women's Craft Retreat organizers that my class has reached its maximum quota: Six ladies who have signed on for a watery adventure next weekend, beginning on Oct. 2.

Susan also told me I have one of the biggest classes. Not sure if I am pleased or worried about that added pressure ;-)

I've got another iris miniature in progress as I warm up for the class. I'll get that posted soon.

Monday, September 21, 2009

Iris miniature


Work on the painting of my dad's house has come to another screeching halt. Can't carve out a large enough chunk of time to focus on the project, so I'm back to quick miniatures, part of my exchange with my friend Mary.

I think I've painted this same iris six times since May. Each miniature has been very different. So that's been fun, to take the same source and add something new to it each time. I understand now why some artists love to paint series. This is my version of a mini-series.

I like the super-bright highlights on the edges which make this flower look backlit. The source photo shows the bloom in soft, even light, so I'm pleased to create my own reality for this scene.

Saturday, September 5, 2009

ROUGH drawing


Here's a rough drawing that sets up the horizon line, lighting angle, and main composition elements of "Our House," so to speak. This is the project I've doing for my dad -- that's taking me years to complete.

I may yet tighten the frame, and eliminate some of the extra foreground space. But finally, I have something down on paper.

I do like the lighting angle, though. I think it will add a golden glow to large areas, and contrast nicely with cooler shadows, particularly in the large pine next to the house. I imagine this as late afternoon, early evening light.

Sunday, August 23, 2009

Teaching a class


Well, it's official. I am teaching a beginner watercolor class as part of a women's art and craft retreat at Camp Pinnacle sponsored by the Hardy County Community Educational Outreach Service (CEOS), an affiliate of the West Virginia University Extension Service. The retreat begins Friday evening, Oct. 2, and runs through Sunday, Oct. 4.

Here's the description of my class, from the retreat information form:

Watercolor Painting - Students will learn about watercolor painting materials and techniques for applying paint to paper. Using these basics, students will complete a small landscape. Once familiar with tools and techniques, students will then learn about mixing colors, with another small landscape as an end result. If time permits, we'll finish up with a small floral painting which will incorporate all the class lessons.

I'm nervous about teaching a class to adults, but I'm telling myself that my class with teenagers last summer at 4-H camp went well, and that this class should follow the same pattern.

My qualifications, for anyone interested in taking the class? I am mostly self-taught, but have years of experience with watercolor, having been painting almost exclusively with the medium for about 18 years. I have taken workshops with skilled painters, including Kay Gillispie of Elkins/Arborvale, W.Va., Ron Thurston (AWS) of Pittsburgh, Vivian Ripley of Columbus, Ohio, Catherine Hillis of Purcellville, Va., and most recently Lynn Ferris of Berkeley Springs, W.Va.

I am an affiliate artist with the David L. Dickirson Gallery at Tamarack: The Best of West Virginia in Beckley, W.Va.

As for my subjects, I am interested in realistic scenes, mostly landscapes and some florals, and the interplay of light and shadow is what attracts me to painting.

I want to stress that this class is for beginners. I want to teach participants about watercolor tools, how to select brushes, papers, and paints, and other necessary items, like tapes and boards.

Then I will go over paint applications, then discuss color mixing.

I provide all materials for the class. I just need six enthusiastic students.

To see my work, or to download a registration form for the retreat, go to my Web site: www.waitesrunstudios.com

Other classes at the retreat include knitting, tapestry weaving, flower arranging, chair caning and more! A range of lodging options is offered, and costs are very economical. Full lodging and all meals costs $75.00, and cheaper options, including half-day classes, are available. All the classes have a small materials fee (my fee is $11, which covers the costs of paper, paint, etc.)

Camp Pinnacle is just west of Wardensville. From Wardensville, traveling west, turn right onto Pinnacle Drive about 1 1/4 mile after the 4-lane section of W.Va. 55 (Corridor H) begins.

Tuesday, August 4, 2009

Back on task

I've finally gotten back to my dad's painting project. I took down the foamcore house model from where I had stored it (wanted to keep it away from the kids' hands), set up a white background, and am working on positioning my easel with a lamp attached to it to simulate bright sunlight.

Still wondering how to simulate the large pine tree to the side of the house.

But at least I'm thinking about the project again.

Thursday, July 30, 2009

Enough with 'New Ideas'


I think it's time to say "enough" with this test painting. I had lost interest in it a couple of weeks ago, and then I had my young visitors, so I hadn't returned to it.

Most of the updates concern the foreground: the high weeds around the buildings and the pasture in front.

I didn't do anything with the secondary building to the far left. I think it was a compositional mistake to include it, or at least it was a mistake to let its roof be so dominant and so light.

I played with using white crayon after painting the first yellows for the high weeds to help retain that color and created a more ragged edge for the plants once I brought the reds and mixed blacks of the barn's sides and shadows down against the plant's tops. It wasn't all that successful a technique. I think I would have to use a clearer wax resist to try it again. The white crayon dulled the yellow too much, I think.

Wednesday, July 29, 2009

Another young painter


Continuing the theme of young painters, I hosted another budding artist over the weekend. Kadie, my 4-year-old niece, worked on an abstract, with an overriding need to cover every inch of white paper with paint. She had an explanation for all the painting's elements, but I admit, she lost me after a bit.

She also completed a crayon portrait, which at times alternated to a landscape, depending on what story she wanted to illustrate. Eyes became ocean, hair shifted to grass.

Isn't art the greatest means to ultimate creativity? Make it whatever you want, as long as it fulfills you as its creator. Paint with a child for a while, and your perception of art will change.

Wednesday, July 15, 2009

Portrait of the Artist as a Young, Young Man


Today I am proud to display the work of my nephew Zack, who came to stay with me for a few days over the weekend. When he visits, he likes to use my studio (which is only natural since it doubles as my spare bedroom) and paint with Aunt Kristen.

As a six-year-old, Zack is all about color and more color. If it's bright and bold, he likes it. I could use some of his confidence when painting, I think.

He noticed the unfinished barn painting I discussed in my last post propped up along my desk, and decided he wanted to complete a version of the same scene. Amazingly, like me, he decided he was dissatisfied with the foliage in the background, and omitted that part of the scene. So his version has a very airy feel.


As for the rainbow . . . well, on that piece we explored a range of ideas. He was disappointed that his paints only included red, blue, yellow and green (as well as black and white), but I explained that his paints were more than sufficient if he wanted to make a rainbow.

So we employed a few techniques, including painting wet- into-wet, as well as glazing, to create the spectrum of Red, Orange, Yellow, Green, Blue and Violet (we skipped Indigo). We also used those techniques to create the cheery sun in the upper left corner.

The young artist proudly presented the fruits of his labor to his mother yesterday morning. And I look forward to my next painting session with him.

Friday, July 3, 2009

New ideas


I'm trying out some of the ideas from Lynn Ferris' workshop, specifically the idea of mixing colors on the paper rather than on the palette.

I did a fast sketch of this scene on a piece of 140# cold press Arches, stretched over a board. Then I plunged in -- and immediately hated how it was turning out.

But I keep plugging along on this. I have no plans for it -- it's purely an experimental exercise, but it's slowly growing on me.

What I'm most unhappy with is the background foliage. It feels like a flat, green mass, with very little sense of depth.

But what I'm most pleased about are the blacks, the shadows within the building. I'm worked hard with using the complements together there, mixed on the paper. (They're permanent Alizarin Crimson and Pthalo Green, by the way).

So an interesting experiment so far. I'll see how it comes out.

Monday, June 15, 2009

Lynn Ferris Watercolor Workshop


I haven't been painting much, as is evident by the dearth of posts I've made lately. So it was wonderful to have an amazing artist conduct a workshop so close by this weekend.

The Lost River Artisans Cooperative in Lost River, W.Va., hosted Lynn Ferris (painting in the photo above) of Berkeley Springs, W.Va., for a two-day workshop, June 13-14. Lynn has garnered several awards from regional artist groups, as well as a feature article in a national magazine. She spends part of her time in West Virginia, and then heads to Florida each winter where she participates in several well-known art festivals.

I'm amazed at artists who make their craft a way of life -- and the means by which they live. But to hear her talk about life as a working artist, the vision isn't entirely made of roses.

When Lynn prepares to paint, it is work. It's her job.

Thankfully, she says, its a job she really, really enjoys, but she admits that the knowledge that she's earning her keep with each stroke of her brush is ever present. "It's how I pay my mortgage," she says.

In fact, she acknowledges some envy of those who can paint without the burden of financial worries. Time is a critical element for her, given her show schedule, teaching duties, and day-to-day business needs, so when she has carved out painting time, it has to count.

It was an eye-opening conversation for me. I grumble and worry about finding time to paint because of my job. Here's someone who paints for a living, but who still has so many of the same wishes. We both want to paint just to paint. But we are limited in finding that time.

So in a sense, I received two sets of lessons over the weekend: one involving brush, pigment and paper, and another about life.

As for those tangible painting lessons, let me recount what Lynn emphasized.

She uses a limited palette, relying most heavily on a triad of colors: Phthalo Blue, Alizarin Crimson, and Cadmium Yellow. She also uses a great deal of Phthalo Green. All but Cad Yellow are transparent, so why the opaque pigment, I wondered?

It's all about the color, Lynn explains. It's an "honest" yellow, that's consistent from brand to brand, helpful in teaching her classes, but it's also the right tone for her work. And she uses it thinly, so it functions in a transparent way.

With this limited palette, she took us through a series of exercises, intended to stress mixing colors on the paper, and the advantages of glazing. She also conducted a demonstration and lesson on negative-space painting that really has the potential to simplify ideas for me.


The second day led up a capstone lesson on using all the previous exercises to define a structure's form with dramatic shadows. Her shadow technique is the critical reason for my interest in her work. Her shadows are so eye-catching and full of flowing colors. In this photo you can see Lynn applying her go-to pigments in a wet-into-wet style.


Here she is drying the first layer with a hairdryer. Subsequent glazed layers, applied in a similar way, create depth within the shadows. No boring grays and neutrals here. It's an amazing transformation from stilted geometry to brilliant, emotional passages of color.

It was a great workshop, with plenty ideas for me to chew on.

To see more of Lynn's paintings, visit her Web site: www.lynnferris.com.

Lynn's latest work, a series of figurative paintings, some of which have won significant awards, is on display now at the Monongalia Arts Center, Morgantown, W.Va., through the end of June. For more, see http://monarts.bizland.com.

The artisans' cooperative is planning more classes through the summer, including photography, chair caning, stained glass, natural fiber dyeing, and eclectic birdhouses. For more on the classes, see www.lostrivercraft.com.

Thursday, May 21, 2009

Vacation sketches


I gave my sketching kit a workout last week as my husband and I took a wonderful trip to Holly River State Park for a weeklong vacation.

Holly River is in an isolated area of central West Virginia, and it is our favorite of West Virginia's many wonderful state parks and forests. There are only 10 cabins, clustered in an amazing grove of old-growth hemlocks, and the soothing sounds of water rushing through Laurel Fork, down the hill about 20 yards, sends me peacefully to sleep each night.

We easily fell into a routine. After a morning of hiking, we would wash up and then venture out in late afternoon to find a comfortable swing or bench. I would then sketch or paint, while my husband read. Evenings consisted of lazy strolls through the park grounds, card games or a jigsaw puzzle.

I completed four sketches. A view of our cabin is at the top of this post.

Below is a view of the park office. All of the buildings at Holly River, most of which were built by the CCC boys during the Depression, are made of log or smooth river stone, or a combination of those materials.


My sketching kit performed admirably, and after the first sketch, I was able to adjust to the challenges of rendering linear perspective. Since I've fallen into the pattern of working from photographs, I find myself using the print's edges to develop vanishing points when drawing. For plein air work, that visual reference is gone. These sketches are a little off, but generally accurate, and I was pleased to make the adjustment.

For more about Holly River State Park, visit their Web site, www.hollyriver.com

Monday, May 18, 2009

Mixed media

I've been doing a few miniatures as part of a project with my friend Mary VanMeter, owner of Water Street Gallery in Petersburg, W.Va. Mary's not into the internet or e-mail, preferring a solid correspondence as a way to stay in touch. So we've been sending notes to one another this spring, each containing a miniature original.

The last two I've completed have used watercolor and colored pencil. I did not save an image of the first mixed media attempt (Mary has it now), but here's the second one, which I'll pop into the mail tomorrow.

Once upon a time, I was very proficient with colored pencil, which suits my neat-freak, controlled style. But it fits me too well...

Watercolor allows me the opportunity to be bolder and less controlled. Happy accidents are just magical, and water and pigment provide those wonderful surprises in abundance.

This little piece, which is the size of a trading card (2.5" x 3.5") requires me to simplify shapes.

I've done a few small pieces which are quite detailed, but I think this miniature exercise should expand my techniques, rather than shrink my existing style. So I've been trying out new ideas in the series. The simplification of shape and the addition of another medium are just two of the ideas I've explored.

I'll continue to make some other attempts in this vein. I'm trying to make myself think in terms of woodblock prints, with sharp edges, simple shapes, and stark contrasts. I think contrast is what this piece still needs.


Saturday, May 9, 2009

Sketching kit

I've put together a little sketching kit that's easy to transport and uses some interesting brushes that carry their own water supply.

Sketching works better for me if I start with a pen drawing of a subject. I'm using Pigma Micron pens with black waterproof ink. I use three nib sizes to create some interest in the drawing with the thicker and thinner lines.

Then I wash over the drawing with my watercolors. The final paintings have the look of book illustrations, but I enjoy the process and the final result. They feel very fresh.

For my travel-size kit, I'm using a postcard-sized watercolor block with Canson Montval paper. I also have a 4H pencil for initial drawing, the three Pigma pens, and a kneaded eraser.

The traveling brushes are moderately priced. These are made by Royal Langnickel, but I've seen other manufacturers offer them as well. The handle of the brush is a clear plastic tube. The plastic is somewhat flexible. Water goes into the handle, and then you squeeze the tube at a point near the brush tip (which screws onto the brush handle). Water then comes through the brush hairs.

It takes a little getting used to it, but, for this kind of light wash treatment over the pen drawing, it works well, and it's great to not worry about balancing a separate water container on my knee.

The brushes came in a package with three brush sizes.

You can see the entire kit, plus a paper towel and my travel-size watercolor palette, in the photo below.

Tuesday, May 5, 2009

House model complete


It's rough, and I guess it looks somewhat comical, but this model does provide me with the information I need to move forward with this project.

My cutting tools did not provide the control I needed to make really clean cuts, so there are plenty of rough edges in the foamcore, as you can see. And I know my front steps and window frames are twisted as well.

But I can't explain how much fun it is to direct a strong light at the model and then move it around. I love watching the shadows that help define the shape of the structure move and twist with the changes in the light's angle and strength. I also enjoy examining how some edges are sharp and well-defined, while others are soft and fade away.

These are the elements that really draw me into painting: the interplay of light and shadow. The relationships are endlessly fascinating.

I believe the general dimensions of the house are correct, aside from the porch depth being a little too deep. I also have to take into account that the house really was situated on a slight slope, so that changes some of the proportions when I start drawing. The front corners of the porch are also angled in real life, but to simplify the model construction, I did not replicate that shape.

Wednesday, April 22, 2009

Tamarack Artist!


The jury for Tamarack was yesterday -- a long 10-hour trip down and back to Beckley, but it turned out to be worth the trip: I was accepted into the Tamarack artists' gallery! That's been a goal for the last several years, and I am very happy (and relieved) to have made it.

Tamarack is a large art and craft gallery located on the W.Va. turnpike (Interstate 77) outside of Beckley, W.Va. It opened in May 1996 after about seven years of work devoted to developing the concept, working with artisans, contractors, designers and local officials.

Its goals, according to the Tamarack Web site, are: "to boost the state’s economy by fostering a market-driven approach to selling indigenous products. As a world-class facility, Tamarack is destined to become a major tourist attraction, expand job opportunities and draw more than 500,000 visitors a year. The Tamarack facility is the focal point of the Tamarack distribution system, which markets West Virginia-made products throughout the state."

The facility is supported by the state of West Virginia. Its operation is currently under the umbrella of the state Parkways Authority administration. Gov. Joe Manchin is talking about moving the facility under the direction of the state Department of Commerce, but no moves have been made yet.

A conference center was added to the facility in 2003.

The shape of the facility is similar to a doughnut or a wheel, with a central, open courtyard for sculpture. The interior circles back onto itself with displays divided among fiber, jewelry, pottery, glass, furniture, books and music, etc. The triangular spires on the bright, orange roof, which resemble a quilt pattern if viewed from above, are the most striking part of the building's design. The design is also used in Tamarack's logo.

Most of the work in Tamarack is artisan- and craft-oriented, and Tamarack buys much of its craft and fine craft inventory through wholesale sales, but there is an art gallery, the David L. Dickirson Gallery, that usually puts on six or seven shows a year. Artists are paid by commission in the gallery.

The shows at the Dickirson are usually thematic. Animals, for example, are the focus of a show going in later this month.

As a member artist for the Dickirson gallery, I am to stay in contact with gallery staffers and let them know what kind of works I'm completing. The staff then uses the information coming in from the artists to compile ideas for shows, which are planned about a year in advance.

I am eligible for a show next January for the newly juried artists, called "Emerging Artists."

For more information on Tamarack, visit their Web site and E-store at www.tamarackwv.com.

Friday, April 10, 2009

Taking the plunge

I've decided to take the plunge, so to speak, and attempt to jury into Tamarack, a large, state-supported artisan gallery in Beckley, W.Va.

I was approved through a pre-screening process at the start of this month, and have been debating whether to take the next step. I've been hesitating because I worry whether the few pieces I have on hand to submit to the process are worthy. (Now I really regret selling some of my best works).

I'll have to take a day from work to make the attempt, but I guess now is as good a time as any -- I hope.

Jury is April 21. I hope I make it.

Wednesday, April 8, 2009

New project hits close to home

I'm beginning a new project that I expect will require many weeks to complete. It's also a painting that I've been putting off for years.

My father wants me to paint the home in which he and his siblings grew up. The house burned back in 70s, so I all I have are old photos of the place. His siblings and their spouses have also expressed an interest in the project, and have been searching for more photos. So now I have the formidable expectations of my father to meet, and more still.

Here's an example of the challenge I face. This photo includes one of my great uncles, a cousin, and a neighbor. I think the image was made in the 1950s. And this photo is about the clearest image I have of the house. The structure appears in random photographs, but always as a cropped background element as photos were taken of my dad and his siblings, other family members, a pony, farm equipment, etc.


From these fragments, I can create rough line drawings, but I need better information on the structure as sunlight passes over it -- the key element I look for as I create realistic paintings.

To counter the limited information I've gleaned from the photographs, I am taking the experimental step of building a rough model of the house from foamcore and shining a light on it to simulate the effect. I'll update that project as it moves along.

Sunday, March 29, 2009

Finished Old Iron


I believe this one is finished. Or, at least I've removed it from the board, trimmed the edges and signed my name. That's usually a good indicator that I don't know what else to do.

Some elements of the tractor please me, some not so much. I think I was trying to include too much detail in too small of a shape.

The barn slats, however, I'm very pleased with. It's a technique that I want to use again.

I also am pleased with the background foliage, particularly the woods to the side of the barn. I scrubbed out areas after I had painted tree trunks and shadows and flooded Quinacridone Gold (PO49) into those spots. Sadly W&N discontinued this paint a few years ago, so I use what I have sparingly. It's wonderfully active in wet-into-wet applications, creating natural-looking sunlit foliage as it floods the paper.

I'm pleased with the overall look, and think I've accomplished the goal of reprising a scene that includes the elements of the earlier painting, but in a distinctly different composition. I hope that my friends who requested the piece are pleased with the result.

Tuesday, March 24, 2009

Almost there


I'm almost finished with the tractor (and with the painting). I still have to work on the shadows of the steering wheel and tighten up some of the darkest areas so the highlights will stand out better.

One thing is for certain: As much as I love the 7x10 size of watercolor paper, I've got to start painting larger works if my eyesight is going to hold out. I've spent a couple of hours this morning with my glasses removed and my nose only an inch or two from the surface of the paper so I can work on the tiny details in the tractor. The whole tractor is only about 4 inches wide, wheel to wheel, and two inches high.

The grays on the tractor body are a mixture of Pthalo Blue and Burnt Sienna, which tends toward a greenish grey. I've also added touches of Ultramarine Blue in places. The red wheels are Winsor Red (Pyrrole, PR254), with the shadowed reds being touches of Permanent Alizarin Crimson dulled with Viridian, and sometimes mixed with Ultramarine Blue for a purplish shadow effect.

Tuesday, March 17, 2009

Masking fluid removed


I've removed all the masking fluid from the foliage and from the tractor, so now I am working on those areas.

Foliage is pretty well done. I like the hard edges of the foreground leaves contrasting with the softer, wet-into-wet areas of the background trees, and the bright yellow (aureolin) pops.

The tractor will be slow-going work. Lots of tiny areas and I'm using small brushes. I've also discovered another characteristic of aging...despite my pronounced nearsightedness, I have to take off my glasses to paint tiny details now....with my glasses on, the brush never hits the mark I intend it to.

Thursday, March 12, 2009

Removing mask


I've removed the tape and masking fluid from around the tractor, and also from the shadowed windows and stone on the barn's foundation. The blue mask on the foliage remains, but that will be the next to go now that I have the rough shape of branches added in. The foliage will fill in more after the highlights are exposed, so I hope the branches will lose some of their scarecrow effect shortly.

Saturday, March 7, 2009

Background foliage


I'm filling in around the barn with the foliage. The bright blue is masking fluid, reserving bright, sunlit foliage, and the foreground tractor is masked off with tape and some more masking fluid. By preserving these areas, I can use more wet-into-wet techniques to soften the foliage, particularly in the background, so the barn and the tractor can move forward in the composition.

The greens are a combination of Phthalo green mixed with Phthalo blue, burnt sienna, raw umber, and yellow ochre. I also used a little of Quinacridone gold because, when dropped into wet areas, it pushes other colors away, creating warm highlights in foliage.

Thursday, March 5, 2009

Barn boards technique


Here's a close-up view of how the tape technique turned out. I really like how the low-tack tape allowed some amount of bleeding under the edges, allowing for a nice contrast between very straight edges and rough uneven patches. It visually matches the rough textures of the barn slats.

Friday, February 20, 2009

Old Iron begins

So far, not much progress to report. With my "real job" schedule, it's hard to find an undisturbed period in which to paint. But I finished the drawing, prepared and stretched the paper, and have begun working on the barn..though using a technique very new to me.


I taped off the geometric shape of the barn (which is in the background) and mixed Burnt Sienna and Ultramarine Blue for a very wet wash over the area. I wanted to get some texture into the color to create the look of weathered wood, and in this version, unlike the last, I'm using cold press paper. So I can't use the tooth of the paper to help create the effect. While still wet, I splattered clear water, then followed that with a darker mix of the complement.

After letting that dry, I trimmed out thin strips of drafting tape (which is what you see in the photo above). I'll paint successively darker washes over the taped area to created the shadows between the vertical slats.

I don't usually use those sorts of techniques because they are very time-intensive, but I wanted to try some different effects in this painting.

Friday, February 13, 2009

New project started

I've finally cleared all the lingering cobwebs from the Kadie portrait from my head (and the paint from my palette).

I've been asked to reprise a painting I did this fall as part of an exhibit at the Lost River Artisans Cooperative. Several member artists created paintings of the cooperative (which is housed in a 150-year-old bank barn) for a small show that highlighted how each artist can interpret a scene.

Several of the works, including mine, were donated as part of a silent auction to benefit programs at the cooperative.

Some friends bid on my painting, but were unsuccessful. So they have asked me to paint the scene again.

This request poses some challenges for me, in that they want a painting that is similar to the other in size, dimensions, and subject matter, but I don't want to create the same painting twice.

So, I've changed some elements of the composition and the viewing angle, plus I will also change the color temperature. Drawing is now done, and I've finished stapling the paper to my board for stretching.

Here are some images of the first version of the painting.


Overall color temperature is cool with splashes of warmth.


Some details of the antique McCormick-Deering tractor on display in front of the cooperative's barn. The barn also hosts the Lost River Museum, and agricultural displays are an important part of the museum's collection.


The finished painting: 7"x10" on Arches 140# rough paper.

The challenge is to make the second version very different. I'll post updates as I make progress.

Thursday, February 5, 2009

Cleaning up


The tape's off; the staples attaching the paper to the board have been removed, and I've trimmed the excess edges.

This is my first watercolor portrait. I've had a few figures in other paintings, but this is the first dedicated attempt I've made in this genre.

A word on the flesh tones. I heavily depended on MaimeriBlu's Dragon's Blood (Semitransparent, using a mixture of PBr7 andPR209). In my previous figure attempts, I had great difficulty working with flesh tones, particularly those tending toward the fair and rosy. Using W&N Permanent Rose (PV19) and Permanent Alizarin Crimson (PR206) in mixtures with Yellow Ochre (PY43), Raw Sienna (PY 42, PR 101), and a host of other yellows, never produced the look I wanted. The reds were always too strident.

By chance I had a trial 6-tube box of MaimeriBlu paints which included Dragon's Blood. It's perfect. It's bright, but not garish. It rewets beautifully (which can be said for nearly all MaimeriBlu paints), and plays well with others. The flesh tones in Kadie are a mixture of Dragon's blood, W&N Raw Sienna, and W&N Cobalt Blue (PB28).

Tuesday, February 3, 2009

Kadie finished

I think she's done. I'm going to pull off the tape and remove the paper from the board. If I get industrious, I'll post a picture of her with clean edges, etc.

Generally, I'm pleased. I've never done a watercolor portrait before (not many pencil portraits in my past, either). I think it pops with color and is not wishy-washy. I wanted to avoid a soft, midvalue painting that wouldn't stand up to perusal from across a room.

Monday, February 2, 2009

Kadie nearly finished


Almost there. I'm still fussing with the foreground hand, and trying to pick out additional enhancements in her hair, etc.

Thursday, January 15, 2009

Kadie still developing

I removed the masking fluid from her hair, and begin to soften some of those hard edges, as well as add some warmer hues to some of the shadows within her hair.

I also began the first washes over her hand, and added a little more definition to her mouth and teeth.

With the addition of the shirt striping I think the strong visual elements are beginning to balance one another.